Transforming your garden doesn’t always require breaking the bank. A charming garden path adds functionality and style, and with a little creativity and elbow grease, you can achieve the look you want without sacrificing your budget. In this guide, we’ll dive into several DIY hardscaping options that create stunning results using affordable materials.
Why Install a Garden Path?
- Improved Navigation: Clearly mark walkways to protect your plants and landscaping while guiding visitors effortlessly through your garden sanctuary.
- Enhanced Visual Appeal: Break up the monotony of grass or soil with a touch of texture and definition, instantly elevating your garden’s aesthetic.
- Year-Round Accessibility: Rainy days don’t have to deter you. A well-designed path offers safe passage even in less-than-ideal weather.
- Reduced Maintenance: Prevent unwanted foot traffic through delicate plantings and minimize muddy footprints inside your home.
Budget-Friendly DIY Garden Path Materials
Gravel: The Versatile and Affordable Classic
Gravel is an absolute champion for cost-effective garden paths. Its unmatched flexibility fits practically any style. Consider these options:
- Pea Gravel: This small, rounded gravel is gentle on feet and comes in diverse colors. It offers a laid-back charm and is generally the most budget-friendly.
- Crushed Stone: Its angular shape provides excellent stability, making it suitable for high-traffic areas. Available in various sizes and earthy tones.
- Decomposed Granite: This finely crushed stone forms a sturdy, permeable surface with a warm reddish hue.
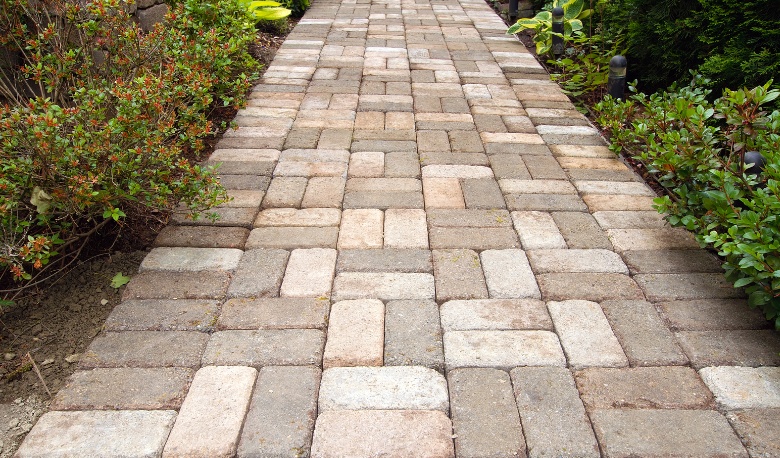
Pavers: Durable and Endlessly Customizable
Stepping stones or pavers create a classic look with endless customization potential. Consider these options:
- Concrete Pavers: Uniform, budget-friendly, and remarkably versatile in style. Choose from squares, rectangles, and even textured options to suit your needs.
- Natural Stone: Flagstone, sandstone, or even repurposed bricks add a timeless touch with their organic shapes and unique colors.
- Reclaimed Materials: Give old materials new life – broken concrete slabs, salvaged bricks, or terracotta pieces can transform into a path full of character.
Mulch: The Natural and Soft Solution
Mulch provides a soft touch underfoot at a truly wallet-friendly price. Explore different types for varying looks:
- Wood Chips: A readily available and natural option, offering a rustic charm.
- Shredded Bark: Longer-lasting than wood chips, with a warm, rich color palette.
- Pine Needles: Depending on your region, these could be a free and abundant resource adding a woodsy feel to your garden.
Step-by-Step DIY Hardscaping Tutorial
While each type of path has its nuances, the basic steps are relatively straightforward:
1. Design and Layout
Begin by envisioning the perfect path for your garden. Map out your desired route, determining the ideal width and the overall shape. Use a rope or garden hose to lay out the path, allowing you to visualize curves and bends easily.
As you design, consider how your path will interact with your garden’s existing elements. Do you want something that blends seamlessly with your landscaping, or would a path made of contrasting materials create a more eye-catching statement?
2. Prep the Ground
Once you’re happy with your path’s design, it’s time to prepare the ground. First, carefully clear the path of any grass, weeds, or debris. This ensures a clean base for your new path materials.
For gravel or paver paths, you’ll need to excavate the area. Dig down approximately 4-6 inches to create a sturdy base that will promote stability. This excavation step is less important when creating a mulch path.
3. Install Edging (Optional but Recommended)
While not strictly essential, installing edging does wonders for your path’s longevity and appearance. Materials like landscaping timbers, bricks, or metal strips form a barrier, preventing loose materials like gravel from migrating onto surrounding areas of your lawn.
4. Landscape Fabric (for Gravel and Mulch)
If you’re installing a gravel or mulch path, take the extra step of applying a layer of landscape fabric. This acts as a buffer, suppressing pesky weed growth and improving your path’s stability over time, saving you effort in the long run.
5. Lay Your Base (for Gravel and Pavers)
Now, it’s time for the foundation layer for paver or gravel paths. Carefully fill the excavated area with a layer of packed gravel or sand. This layer is vital as it dramatically improves drainage and prevents both pavers and loose gravel from sinking or shifting unevenly.
6. Place Pavers or Spread Gravel/Mulch
Finally, the most visually rewarding part! If you are using pavers, carefully place each one, ensuring levelness and even spacing throughout the path. For gravel or mulch, spread your chosen material evenly over the prepared base, aiming for a depth of about 2-4 inches. Take your time, ensuring it creates the look you desire.
Tips and Tricks for a Beautiful and Functional Path
With some thoughtful planning and a bit of creativity, you can elevate your garden path from simply functional to a beautiful and inviting feature. Here are a few tips and tricks to help you achieve the perfect blend of style and practicality:
Stay Practical
Before beginning, consider how your path will be used. If it’s a main walkway, ensure the width comfortably allows two people to walk side-by-side. On the other hand, narrower, winding paths are perfectly suited for solitary strolls through flower beds or more secluded garden areas.
Experiment with Patterns
If you’ve chosen pavers, unleash your creativity! Instead of a basic grid, consider patterns like herringbone, basketweave, or staggered designs. These arrangements instantly add a touch of personality and visual interest to your garden’s landscape.
Soften the Edges
Create a harmonious transition between your path and its surroundings by incorporating low-growing groundcovers. Creeping thyme, sedum, or even moss can beautifully soften the edges of your path, integrating it seamlessly into the rest of your garden.
Add Lighting
Extend the enjoyment of your garden path into the evening hours by adding lighting. Solar-powered stake lights provide a gentle glow, guiding you safely along the path while creating a magical ambiance for nighttime strolls.
Enjoy the Process
Building a garden path is a rewarding project! Don’t be afraid to get your hands a little dirty – involve friends, family, or enthusiastic neighbors to make the process even more enjoyable. The journey of transforming your garden space is as delightful as the destination.
Conclusion
Building a garden path is an incredibly rewarding way to enhance your outdoor space. With a little planning and the right materials, you can create a path that’s as stylish as it is functional—all while staying within your budget. Whether you favor the laid-back beauty of gravel, the classic appeal of pavers, or the natural softness of mulch, there’s an affordable DIY option out there for you.
So, roll up your sleeves, gather your inspiration, and get ready to transform your garden, one step at a time. And remember, the journey of creating your perfect garden path is a joy in itself!